Back in November I purchased a set of four Percussa AudioCubes. I've spent quite a bit of time working with them as a an interface to Ableton Live. In this hands-on review I'll explain what they are, how they work, how I'm using them with Live and also offer some tips along the way.
What Are AudioCubes?
Audio Cubes were invented and are manufactured by Percussa, a small privately held company in Belgium. Each AudioCube is a portable self-contained computer that acts as a tangible interface. The cubes detect location, orientation, and distance information from your hands and/or other AudioCubes. This information (MIDI or OSC) is then routed to your favorite music application via free software that is provided by Percussa. The software runs both on MAC and PC. I'll be focusing on MIDI, Windows, Ableton Live, and the MIDI Bridge application in this review, but will offer a summary of other Percussa apps at the end of the review.
What Can They Be Used For?
Common uses are music performance, visual performance, sound design, composition, DJing, and installations. You can also use them as lo-fi audio generators.
Detection
Cubes communicate and detect position and orientation by transmitting and receiving both analog and digital signals via infrared sensors on cube faces. Four faces on each cube have sensors – top and bottom faces do not have sensors.
Drivers
No need for additional drivers, as AudioCubes use class-drivers. Just plug the cubes in via USB and the cubes are automatically detected. Each cube has a rechargeable battery which is charged via USB.
One Button  There is a switch on the bottom of each cube that is used to toggle power as well as to put the cube in a mode where you can apply firmware updates. Updates are applied via USB and a firmware upgrade app that runs on your computer.
MIDI Controllers
When you use AudioCubes as MIDI controllers, you can configure a cube to send note-on messages or Continuous Controller Messages.
LED Light Sources
AudioCubes are also LED light sources. The color can be set via the free software, and attenuated by hand position in certain modes. You can also send RGB commands to cubes via MIDI continuous controller messages.
Packaging
Cubes are sold individually or in sets of 1,2,4, 6, or 8 cubes (I'll cover pricing later on in the review). They are packaged in a cardboard protective box with a slot for each cube. I have to say I was surprised at how nice the packaging was – reminded me a bit of Apple packaging.
In the box were 4 AudioCubes, one USB cable, guide, and a CD containing software (although I recommend you grab the latest software online). My cubes arrived with enough of a charge that I could start using them right away.
One-Time Installation Steps
When you first get your cubes, you need to do some initial setup.
- Update the Firmware: Percussa continues to improve AudioCubes and posts firmware updates on their web site. Make sure you Download the latest firmware, Download the firm ware upgrade tool, then Follow the directions in the Upgrade Manual.
- Install MIDI Ports: In order to use AudioCubes with Ableton Live, you need to install virtual MIDI ports. For windows users I recommend MIDI YOKE. I believe on MAC you can use the native MIDI ports.
- Install MIDI Bridge: Next you'll need to download and install a free Percussa application called MIDI Bridge. This software is included on the CD that ships with the product but I recommend download it anyway so you get the latest version. MIDI bridge allows you to use your 1-4 AudioCubes to control your DAW – in this case Ableton Live.
Configuration For Each Use
For each project you’ll need to configure the MIDI Bridge and Ableton Live to accommodate your needs. MIDI Bridge allows you to set the mode for each AudioCube, configure parameters, and save and load configurations. You can configure an AudioCube to run in one of three modes – Sender, Receiver, or Sensor. More on modes below.
I configure each cube so that it receives input on MIDI channel 1, and output on MIDI channel 2. This helps prevent the possibility of a MIDI feedback loop. I put each cube on it’s own MIDI channel so that I can isolate color commands going to each cube.
In Ableton Live Options, I configure MIDI Yoke Channel 2 as input, and Channel 1 as output, again to prevent MIDI feedback.
Modes Demystified
Sender – A cube configured in Sender mode sends information wirelessly to Receiver cubes within range. As you can see from the screen shot below, you can set the color of a connected Sender cube, MIDI Channel, as well as select which MIDI Ports are used for communications in and out. Once configured a Sender cube can be unplugged if you don’t want to send it color commands.
Receiver – Sensors on the faces of a Receiver cube can detect the face of a Sender cube within range. In other words, Senders and Receivers work together and when two faces are aligned within about 4 inches apart, the Receiver will send a MIDI note-on to your DAW. 
Rotating a Sender 90 degrees will send different note information. 
In the screen shot below you can see I configured Cube 1 as a Receiver, changed it's color to blue, set it to receive colors changes via MIDI (CC14 = Red, CC15 = Green, CC16 = Blue). Receiver cubes must be plugged in so they can communicate via MIDI ports to your DAW software.
Prior to capturing this screen I placed a Sender cube next to this Receiver cube so that face 3 on the Sender was aligned with Face 1 on the Receiver. MIDI Bridge gives you real-time feedback on Cube status and you can see in the screen shot that a red indicator lights when faces are detected. When this occurs, MIDI note-on D4 will be sent through MIDI Output "MIDI Yoke NT: 2".
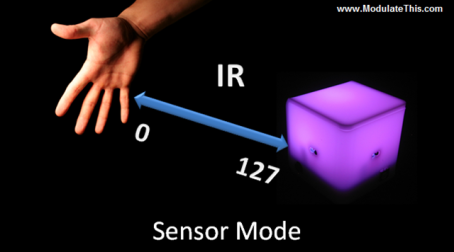
Sensor – Cubes in Sensor mode can detect other cubes as well as the distance to your hand or objects. This information is translated into MIDI Continuous controller data. Each Sensor cube face can be configured to a different CC. So by moving your hands and fingers in front of a sensor you are able to modulate parameters that have been mapped in Ableton Live. One big advantage of using Sensor cubes over knobs is that you can modulate four parameters at the same time. Distance for hand detection starts about 4 inches away. Wireless sensor range cube to cube is more like 2 feet.
Prior to performing you’ll need to calibrate cubes configured as Sensors so that each face will produce a full 0-127 data range. Simply bring your fingers in to cover each sensor in sequence, then take your hand away and hit the “Calibrate” button. Make sure you cube isn't’ near any other infra-red sources or this will throw off the calibration. You may have to repeat this process a few times. If covering a sensor does results in a number less than 127, push the gain slider up a little for the face until you reach 127.
Mapping in Ableton Live
At this point all you need to do is MIDI Map (CTRL-M) cubes to your Live Set or create note targets by creating corresponding devices or instrument racks. In the screenshot below (click to enlarge), you can see that I’ve mapped C3 and E4 to Cube faces. If I slid the green cube down a little so the sensors line up with the Receiver a C3 note would be sent via MIDI Bridge through MIDI Yoke to Ableton Live. If I then rotate green Sender cube 1/4 turn clockwise, an E4 would be transmitted. 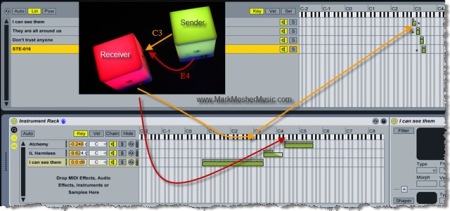
In this example I’ve created an Instrument Rack in Ableton Live with key splits containing instances of Alchemy, Harmless, and Ableton Sampler. The C3 note maps to the rack which maps to a particular sample in Sampler. E4 triggers a note in Harmless.
Sensor cubes transmit Continuous Controller information. CTL-M to turn on MIDI mapping then select the control you want to modulate. In the example below I’ve mapped Beat Repeat and PingPong Delay device parameters. I’ve also mapped the X/Y performance pad and filter cutoff and resonance for Alchemy to cube faces.
Tip – The cubes are quite sensitive so I recommend you use MIDI Bridge to turn off all cube faces, then turn on just the cube face you want to map. Map it, turn it off, and map the next face – repeat. I’ve made a suggestion to Percussion to add more mute and solo options with MIDI bridge to speed up the process.
AudioCubes as Lights
In order to send light commands to cubes that have to be connected to the USB port. The advantage of this is that they run at USB 2.0 data rate speeds and are extremely responsive. In the screenshot below, you can see how I’ve set up two MIDI channels with MIDI clips to send color commands to two different cubes. Again – CC14 = Red, CC15 = Green, CC16 = Blue. 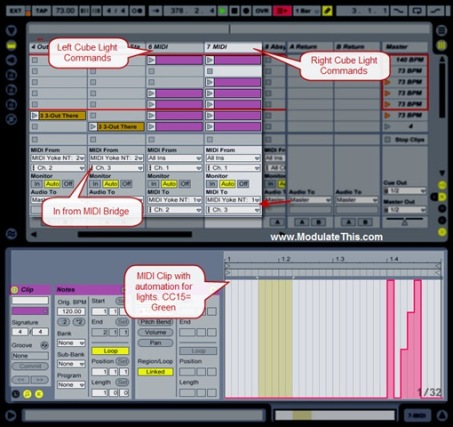
Cube color is bright and fairly uniform. Turning all colors on give you white, all colors off turns off the light source. 
My Favorite Configurations
By now it should be clear that MIDI Bridge allows you to configure your cubes any way you like. Some common configurations I use are:
- 2 Recievers, 1 Sender, and 1 Sensor. In this configuration I can have a a receiver cube on the left and one on the right. Light commands can be synced to match stereo imaging of the audio. With two Receivers and one Sender there are 32 possible Note-on commands. I set the Sensor cube so that the LED is off, and then configure each side of the cube so that I can control cube color with hand movement.
- 1 Sensor. I use this config for doing sound design on the couch to overcome the lack of modulation controls on the Akai LPK25.
- 2 Sensors. This allows me to modulate 8 parameters with 2 cubes. I used this configuration in my recent video "Enumerating" – One Patch Performance Video Series
http://www.youtube.com/v/WER80kxOQUw&hl=en_US&fs=1&&hl=en</embed></object></div>";” src=”https://modulatethis.files.wordpress.com/2010/01/6d0b1-6a00d83451cae869e201287735f5b3970c-pi.jpg” style=”BORDER-BOTTOM-STYLE: none; BORDER-RIGHT-STYLE: none; BORDER-TOP-STYLE: none; BORDER-LEFT-STYLE: none” />
Build Quality
The cube case is a hard plastic. The On-off button is robust. While I would not throw them around or drop them, I think they will withstand extended normal use.
Portability 
This picture offers some perspective on AudioCube size. As you can see they are small enough to just put them in a padded backpack.
Battery Life
It takes about 3 hours to fully charge from a powered USB hub and will run for 3-5 hours between charges.
Beyond Ableton
- Support for any DAW – AudioCubes will talk via the various apps to just about any DAW.
- Cube Bending – AudioCubes can be used as a wireless lo-fi sound generator. I’ve not experimented with this at all. If you are interested in this check out the Cube Bending Manual.
- More Apps – Percussa has created a wide variety of apps that work with AudioCubes. The are all FREE! Some of these apps allow you to go beyond the 4 cube limit of MIDI Bridge and allow for more wireless communications.
- AudioCubes Modulor (for composition, loop making, music production, …)
- AudioCubes LoopShaper (for sound design, loop making, music production, …)
- AudioCubes PluginWrapper (for sound design, applying effects, in music production …)
- AudioCubes Deckabridge (for digital DJing …)
Developer Support
Percussa also allows developer access to AudioCubes. They have a C++ Development kit, and a Max/MSP and pure-data (PD) external. More here http://www.percussa.com/applications/developers/. I’ve not looked into it yet, but I’m hoping there is a way to access cube hardware via Max for Live. I can already imagine a great automatable light controller device that would use an X/Y pad to control mixer instead of using 3 MIDI clips to control RGB. Also, it would be fantastic to put the MIDI Bridge function right inside of Live.
Support
Percussa has been very responsive to my questions via email and are open to suggestions for product improvement. They continuously improve AudioCubes via updates to apps and firmware.
Available Direct from Belgium
Other than the custom circuit boards (which are also manufactured in Belgium) AudioCubes are hand-made and hand-packaged. While they do sell through distributors, I recommend you simply buy via their online store as they ship via UPS directly from Belgium. I paid a little more for shipping and the cubes made it to Colorado in 3 days.
Cost/Value
The online store offers pricing in Euros and US Dollars. The going rate for one cube is $197.67 and the price drops as you buy more cubes.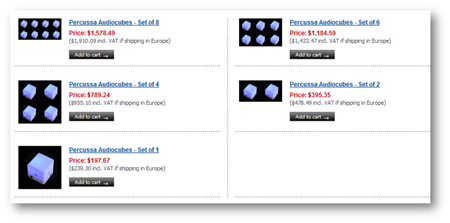
Full disclosure, I paid for the cubes myself -10% off. Comparing the price of an AudioCube against another low cost controller like a Novation Launchpad is a bit like comparing apples and oranges. AudioCubes compete more with other tangible interfaces. Reactable comes to mind. I’m not a Reactable expert, but it seems like Reactable is not only an order of magnitude more expensive, its’ also not portable. Unlike Reactable, an AudioCube is a self-contained computer with sensors – thereby eliminating cameras, projectors, tables, and computers to run the tangible interface. There are less “moving parts” so setup and calibration is also easier and faster with Percussa AudioCubes.
When I consider AudioCube features, support, build quality; the amount of effort it took to shrink many features from a concept like Reactable into a portable self-contained cube; that Percussa offers all their software for Free; and they also are supporting development by third-parties – I feel that the price is quite reasonable.
If you are not sure if AudioCubes are right for you, Percussa also offers a satisfaction guarantee as seen by this note on their online store - “Not sure if you'll like AudioCubes? You have 30 days to send them back if you don't like them, and we'll refund your money. “
Final Thoughts
As you can see from this lengthy review, AudioCubes are very open, deep, and configurable. Like working with a Monone, the current app set seems to be more appropriate for intermediate to advanced artists who are comfortable with configuring routings in a layered app environment. That being said, I see potential for future apps that could simplify configuration to the point where the cubes were more plug-and-play.
As with any complex open device, there is a learning curve with AudioCubes. However, once you get your mind wrapped around configuration and start creating your own templates, configuring the AudioCubes with Live is like business as usual with any controller.
I’m at the point where I’ve transcended the technology and spend most of my time using them to make music and sound rather than spending time on setup. I also love using them as light sources synced with music or hand movement. I’m using the colors and lights as a visual feedback system as well to help me remember where I am in a song
The interesting thing about performing and playing instruments via AudioCubes is that at some point I forget I am using a computer. For me, working with cubes also promotes a cognitive right-brain shift where I sort of lose a sense of time. I feel they boost creativity and I end up taking my music and sound places I might not have expected.
While I’ve not performed live with them yet, I have demoed the cubes for a few people. It’s clear from these demos that the tangible and visual aspect of the AudioCubes are going to assist in getting audiance members engaged. Put simply they are a great tool to help me perform and interact with my Ableton Live rig without having to hunch over the laptop.
More AudioCube Posts Coming
I plan on more posts centered on performing with AudioCubes. I also recently conducted a phone interview with Percussa founder Bert Schiettecatte which I’ll post in the next few weeks.
Links
- Official Percussa Site
- Bert from Percussa on Twitter
- AudioCubes on Facebook
- Percussa’s Online Store
- Download the latest firmware
- Download the firm ware upgrade tool | Upgrade Manual
- MIDI YOKE
- MIDI Bridge
- Percussa AudioCube Manuals
- Percussa YouTube Channel
- Video overview of the Proggesions Sound Pack
- User Forum
Mark Mosher
Electronic Music Artist, Composer, Sound Designer
Louisville/Denver/Boulder
http://www.modulatethis.com
http://www.markmoshermusic.com
http://www.twitter.com/markmosher










Leave a Comment